
Remove Border from Header
 12:16 PM |
 Posted by
Unknown |


Change the 1px next to "border" to 0px. Preview and save it.


How to make each link open in a new window
(it's only about 5 lines down from the top)
then insert this coding:
directly below it.
Click save and you're done!
Add a Signature to Every Blog Post -
First things, first though. You actually need a signature graphic before you can add one. There are several places online that will create a graphic for you, but I, of course, prefer to create my own. If you want to get one automatically generated, you can check out My Live Signature to generate one.
Once you have an image, you'll need to save it to the web. You can always just insert it into a blog post. Make sure to click on Large for the size, and click on either Right or Left depending upon where on the post you want the signature to appear. Now, preview your post and right click on the image. Click on "Copy Image Location." Make sure to paste that to a notepad document right away and leave that doc. open. YOU WILL NEED THIS SOON!
Ok, now to putting the image into your blog.
The First Way
The first way is to simply add a little bit of code into your Post Template. You can find this by clicking on Settings, then Formatting on your Dashboard. At the bottom of the page, you'll see a field that says Post Template. Simply copy and paste the following code into that box and replace (Your Signature URL) with the url you just pasted into the Notepad doc.

The Second Way (The Best Way)
Ok, this is the best way, because if you've had your blog going for a long time, and you're just now getting around to a signature, this will automatically put your signature graphic into all of your previous posts! Yay! Also, it helps your blog load faster.
So, all you need to do is go to your Dashboard and click on Layout, then click on Edit HTML. Make sure to click Expand Widget Templates. Next, hit Ctrl+F and find the following code:
<data:post.body/>
<p><data:post.body/></p>
Directly after that code, paste this code:
<p><div align='left'><img src='YOUR SIGNATURE IMAGE URL HERE'/></div></p>
Simply replace the words (Your signature image url here) with the url you copied onto the Notepad doc. and voila, your'e signature will now magically appear on all posts of your blog as well as on every new post you make. To change the graphic, simply put in the new url of your new image. If you want to make your image a button that links to your email address, just add the following code directly before
How To Add Post Divider Graphics to your Blog
Now to actually adding the graphic to your blog.
- Go to Layout on your Dashboard and click on Edit HTML (Make sure to click expand widget templates).
- Find the following code: .art-Post or .post (it has to be done in .art-Post for my blog although some people can do it in the .post section)
- You should see something like this if you have found the right place
.post{
position:relative;
z-index:0;
margin:0 auto;
min-width:1px;
min-height:1px;
} - Now, copy and paste the following code directly into that section. (It should follow the same format, with each style element stacked one above the other with a semicolon after each, and make sure that it is all within the brackets } without any extra spaces.)background:url(THE URL OF YOUR IMAGE);
background-repeat:no-repeat;
background-position:bottom center;
margin:.5em 0 1.5em;
padding-bottom:1.5em; - Change "The URL of Your Image" to the actual url you just copied.
- You can change the sizing elements depending upon how big your image is and how much space you would like before and after it. those elements are in purple above.
Adding a Signature
The first way is to simply add a little bit of code into your Post Template. You can find this by clicking on Settings, then Formatting on your Dashboard. At the bottom of the page, you'll see a field that says Post Template. Simply copy and paste the following code into that box and replace (Your Signature URL) with the url you just pasted into the Notepad doc.
<img src='YOUR SIGNATURE URL HERE'/></a>
The Second Way (The Best Way)
Ok, this is the best way, because if you've had your blog going for a long time, and you're just now getting around to a signature, this will automatically put your signature graphic into all of your previous posts! Yay! Also, it helps your blog load faster.
So, all you need to do is go to your Dashboard and click on Layout, then click on Edit HTML. Make sure to click Expand Widget Templates. Next, hit Ctrl+F and find the following code:
<data:post.body/>
<p><data:post.body/></p>
Directly after that code, paste this code:
<p><div align='left'><img src='YOUR SIGNATURE IMAGE URL HERE'/></div></p>
Simply replace the words (Your signature image url here) with the url you copied onto the Notepad doc. and voila, your'e signature will now magically appear on all posts of your blog as well as on every new post you make. To change the graphic, simply put in the new url of your new image. If you want to make your image a button that links to your email address, just add the following code directly before
<a href=mailto:YOUREMAILADDRESS">
Creating a Top Menu
Creating Top Menu
- Log in to your Blogger Dashboard.
- Go to Layout -> Page Elements -> Top Menu –> Edit
- Click "Add Link" to add links.
- If you need a multi-level menu please enter "-" (dash) before the Subitem name, for example: "-Submenu Item".
Please note that Submenu item should be placed below the parent menu item. - Click Save.


How to create a Blogger Page
Blogger has now released the pages feature just like in Wordpress blogs. You can use these pages for about me, contact me etc. The blogger pages are more or less like the blogger posts. But these pages wont appear in the blog archives and the blog feeds.
How to create a Blogger Page?
1. Login to your Blogger Account
2. In the posting Tab you will find an Edit Pages option
3.Click on the New Page button and you will get a new page editor(same as the post editor that you normally use)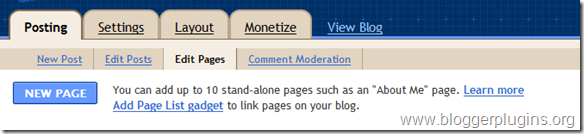
4.You can make the page, in the same way as you create a post.If you want to enable commenting on the page, then you can do so from the post options

5. When you hit the Save And Publish Page button, you will be asked if you would like to add the Page Gadgets onto your blog

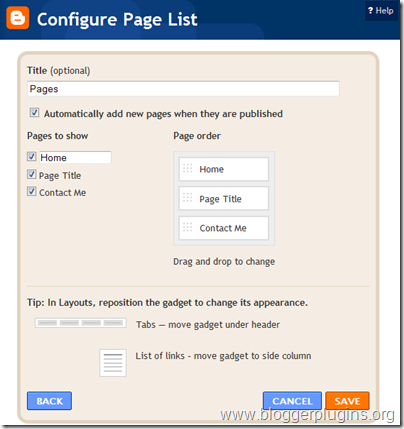
You can add the page gadget on the sidebar or as Top navigation Tabs.These widgets may not properly sync with your blog template.So i would advise you to choose the No Gadget option and add the links manually to your blogger template. You can obtain the links to the newly created pages from the Edit Pages Tab.
If you opt to add any of Pages gadget, then you will get an easy interface to add the page links to your blog. (now available on draft.blogger.com only) Here is what the Gadget options will look like
Limitations
1. You can only create a maximum of 10 pages.
2. Separate templating for pages would be a little too difficult(but not impossible :) )
3. The Static Pages are not included in the Post Exports till now.(at the time when this post is made)
Advanced options.
If you are familiar with the usage of blogger’s conditional tags and want to do something special with the pages, then you can use the following conditional tag for that
<b:if cond='data:blog.pageType == "static_page"'>

When condition is true this will be done

</b:if >
When condition is true this will be done
eg: If you want to hide the sidebar on the Static Pages, then you can use these conditional tags properly to implement that
Here is the incomplete sample code for the same
<b:if cond='data:blog.pageType == "static_page"'>

<style type="text/css">

.sidebar-wrapper{display:none;}

</style>

</b:if >
This code should be placed above in your template.
you will have to add some more CSS definitions to make it complete(you should increase the width of the post area.. ) these will be different from template to template. So you will have to figure it out :)
Misbehaviors
If you are using the automatic post summaries hack, then your pages might not be properly displayed. I have updated the Automatic Post Summaries Trick so that it does not conflict with the static pages. So if you are using an older version of this trick, then do update
2. If you are using some trick to hide the post contents on non-post pages,then also you might end up with problems on your new Static Blogger Page. You can either undo the trick or update the codes properly to avoid conflicts :)
Article came from: http://www.bloggerplugins.org/2010/01/blogger-pages-are-finally-out.html

