
Wednesday, September 7, 2011
How to save your sidebar gadgets
Before installing a blogger template, follow these instructions to save your widgets.
1. Click on 'Layout' tab.
2. Select on 'Edit HTML'. Now you see a code box, scroll down until you see the code shown in the images below:
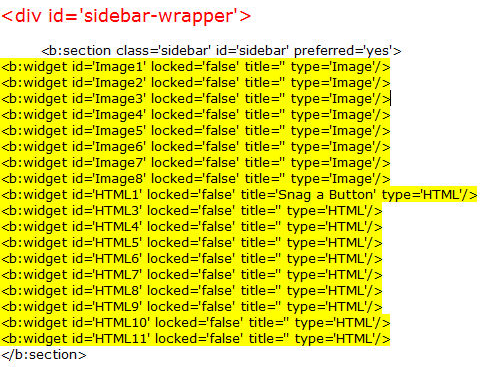
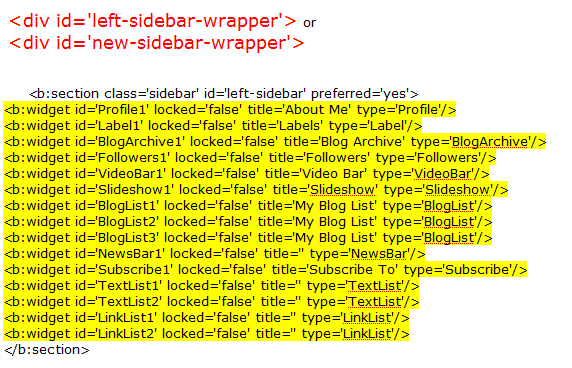
3. Copy all the widgets (highlighted in yellow, yours will be different) Paste what you copied into Wordpad, Notepad or some kind of document. (All widgets start with b:widget id.)
4. Follow my instructions on how to install my blogger template you've chosen and DON'T SAVE.
5. Before saving, go back to your widgets in the document to copy and paste them over the widgets in my 2-column or 3-column code (what I have in yellow).
6. Preview to make sure everything is in it's place. If it is, you can save now. If not, you can always click on 'Clear Edits' and start over or go back to see what your mistake is.
7. Click SAVE.
It's possible Blogger may give you a warning that you are about to 'Delete Widgets'. If that happens you know you made a mistake along the way. Look at the widgets that Blogger tells you that are about to be deleted and add them to one of your sidebars in the code. Continue this until Blogger does save for you without warnings.
How To Convert to 3-Column
First of all, set your template to Minima (not the stretch template, but any color will do!), then follow these instructions:
1. Go to Template>Edit HTML, leaving the "Expand widget templates" box unchecked.
2. Now, find this section in the HTML code:
Copy this entire section below, and paste it directly under the above code. You see the changes we made with the CAPITALZATION OF LEFT:
(this will make the new sidebar float to the left of the main column)
3. Now, you need to find this section further down the page:
. Immedietly before this section, you should paste the following piece of code:
4. If you preview your template, you will notice that the right sidebar will be beneath the main section at the moment. This is because the outer-wrapper is still only wide enough to accomodate one sidebar. So now we need to expand the outer wrapper to accomodate this new sidebar.
Find this section in the HTML code:
We increasd the width of the wrapper from 660px to 880px.
5. Now you need to change the width of the header-wrapper to 880px so that it spans the new width of your blog:
6. You should PREVIEW & then SAVE your template if all is okay. Your new sidebar will not be show as there are no widgets contained within it, though it will still be present in the markup of the page. Once you have saved your template, go to Template > Page Elements in your Blogger dashboard and drag your widgets to the left sidebar.
7. If you add anything to this left sidebar, you will probably notice that it bunches up to the main section. This is because there is no space defined between the left-sidebar and the main section. We need to create this space in the template's HTML. To do this, we will add a margin to the left side of the main posts section. Find the following code in your template's HTML and add the code defined in CAPITALZATION:
This defines a margin space of 20px between the left-sidebar and the main column. You should also ensure you adjust the width of the outer-wrapper from 880px to 900px to ensure the width of your blog is enough to accomodate this margin too. Either that, or you could reduce the width of your main column/a sidebar by 20px to serve the same purpose. Now, PREVIEW your template.
8. Finally, SAVE your template and enjoy your new sidebar!
Also, you can configure your new sidebar to float to the right, and have two sidebars on the right of the main column if you prefer. Simply set the CSS of your new sidebar to float: right; instead.
This tutorial is from Blogger Busters!
Remove Border from Header
Click on "Layout" then ''Edit HTML". Find this part of the code: (There are two parts.)
#header-wrapper {
width:860px;
margin:0 auto 10px;
border:0px solid $bordercolor; }
Change the 1px next to "border" to 0px. Preview and save it.
#header-inner {
background-position: center;
margin-left: auto;
margin-right: auto; }
#header {
margin: 5px;
border: 0px solid $bordercolor;
text-align: center;How to make each link open in a new window
Go to Layout>Edit HTML>and find the coding that says:
(it's only about 5 lines down from the top)
then insert this coding:
directly below it.
Click save and you're done!
(it's only about 5 lines down from the top)
then insert this coding:
directly below it.
Click save and you're done!
Add a Signature to Every Blog Post -
Adding a signature to your blog is just a nice completer to your blog's over all appearance. There are two ways to do this, but I highly recommend the second way.
First things, first though. You actually need a signature graphic before you can add one. There are several places online that will create a graphic for you, but I, of course, prefer to create my own. If you want to get one automatically generated, you can check out My Live Signature to generate one.
Once you have an image, you'll need to save it to the web. You can always just insert it into a blog post. Make sure to click on Large for the size, and click on either Right or Left depending upon where on the post you want the signature to appear. Now, preview your post and right click on the image. Click on "Copy Image Location." Make sure to paste that to a notepad document right away and leave that doc. open. YOU WILL NEED THIS SOON!
Ok, now to putting the image into your blog.
The First Way
The first way is to simply add a little bit of code into your Post Template. You can find this by clicking on Settings, then Formatting on your Dashboard. At the bottom of the page, you'll see a field that says Post Template. Simply copy and paste the following code into that box and replace (Your Signature URL) with the url you just pasted into the Notepad doc.
The Second Way (The Best Way)
Ok, this is the best way, because if you've had your blog going for a long time, and you're just now getting around to a signature, this will automatically put your signature graphic into all of your previous posts! Yay! Also, it helps your blog load faster.
So, all you need to do is go to your Dashboard and click on Layout, then click on Edit HTML. Make sure to click Expand Widget Templates. Next, hit Ctrl+F and find the following code:
Directly after that code, paste this code:
Simply replace the words (Your signature image url here) with the url you copied onto the Notepad doc. and voila, your'e signature will now magically appear on all posts of your blog as well as on every new post you make. To change the graphic, simply put in the new url of your new image. If you want to make your image a button that links to your email address, just add the following code directly before
First things, first though. You actually need a signature graphic before you can add one. There are several places online that will create a graphic for you, but I, of course, prefer to create my own. If you want to get one automatically generated, you can check out My Live Signature to generate one.
Once you have an image, you'll need to save it to the web. You can always just insert it into a blog post. Make sure to click on Large for the size, and click on either Right or Left depending upon where on the post you want the signature to appear. Now, preview your post and right click on the image. Click on "Copy Image Location." Make sure to paste that to a notepad document right away and leave that doc. open. YOU WILL NEED THIS SOON!
Ok, now to putting the image into your blog.
The First Way
The first way is to simply add a little bit of code into your Post Template. You can find this by clicking on Settings, then Formatting on your Dashboard. At the bottom of the page, you'll see a field that says Post Template. Simply copy and paste the following code into that box and replace (Your Signature URL) with the url you just pasted into the Notepad doc.

The Second Way (The Best Way)
Ok, this is the best way, because if you've had your blog going for a long time, and you're just now getting around to a signature, this will automatically put your signature graphic into all of your previous posts! Yay! Also, it helps your blog load faster.
So, all you need to do is go to your Dashboard and click on Layout, then click on Edit HTML. Make sure to click Expand Widget Templates. Next, hit Ctrl+F and find the following code:
<data:post.body/>
<p><data:post.body/></p>
Directly after that code, paste this code:
<p><div align='left'><img src='YOUR SIGNATURE IMAGE URL HERE'/></div></p>
Simply replace the words (Your signature image url here) with the url you copied onto the Notepad doc. and voila, your'e signature will now magically appear on all posts of your blog as well as on every new post you make. To change the graphic, simply put in the new url of your new image. If you want to make your image a button that links to your email address, just add the following code directly before
How To Add Post Divider Graphics to your Blog
Once you've got your image, you'll need to find a place to host it online like Photo-Bucket or Picasa. Or, you can always just upload it directly to your blog - (start a new post, upload your picture, click on preview, right click on the image, and click "Copy Image Location") Make sure to save that url to a notepad doc while you are working so you don't have to get it again.
Now to actually adding the graphic to your blog.
Now to actually adding the graphic to your blog.
- Go to Layout on your Dashboard and click on Edit HTML (Make sure to click expand widget templates).
- Find the following code: .art-Post or .post (it has to be done in .art-Post for my blog although some people can do it in the .post section)
- You should see something like this if you have found the right place
.post{
position:relative;
z-index:0;
margin:0 auto;
min-width:1px;
min-height:1px;
} - Now, copy and paste the following code directly into that section. (It should follow the same format, with each style element stacked one above the other with a semicolon after each, and make sure that it is all within the brackets } without any extra spaces.)background:url(THE URL OF YOUR IMAGE);
background-repeat:no-repeat;
background-position:bottom center;
margin:.5em 0 1.5em;
padding-bottom:1.5em; - Change "The URL of Your Image" to the actual url you just copied.
- You can change the sizing elements depending upon how big your image is and how much space you would like before and after it. those elements are in purple above.
Adding a Signature
The First Way
The first way is to simply add a little bit of code into your Post Template. You can find this by clicking on Settings, then Formatting on your Dashboard. At the bottom of the page, you'll see a field that says Post Template. Simply copy and paste the following code into that box and replace (Your Signature URL) with the url you just pasted into the Notepad doc.
The Second Way (The Best Way)
Ok, this is the best way, because if you've had your blog going for a long time, and you're just now getting around to a signature, this will automatically put your signature graphic into all of your previous posts! Yay! Also, it helps your blog load faster.
So, all you need to do is go to your Dashboard and click on Layout, then click on Edit HTML. Make sure to click Expand Widget Templates. Next, hit Ctrl+F and find the following code:
Directly after that code, paste this code:
Simply replace the words (Your signature image url here) with the url you copied onto the Notepad doc. and voila, your'e signature will now magically appear on all posts of your blog as well as on every new post you make. To change the graphic, simply put in the new url of your new image. If you want to make your image a button that links to your email address, just add the following code directly before
The first way is to simply add a little bit of code into your Post Template. You can find this by clicking on Settings, then Formatting on your Dashboard. At the bottom of the page, you'll see a field that says Post Template. Simply copy and paste the following code into that box and replace (Your Signature URL) with the url you just pasted into the Notepad doc.
<img src='YOUR SIGNATURE URL HERE'/></a>
The Second Way (The Best Way)
Ok, this is the best way, because if you've had your blog going for a long time, and you're just now getting around to a signature, this will automatically put your signature graphic into all of your previous posts! Yay! Also, it helps your blog load faster.
So, all you need to do is go to your Dashboard and click on Layout, then click on Edit HTML. Make sure to click Expand Widget Templates. Next, hit Ctrl+F and find the following code:
<data:post.body/>
<p><data:post.body/></p>
Directly after that code, paste this code:
<p><div align='left'><img src='YOUR SIGNATURE IMAGE URL HERE'/></div></p>
Simply replace the words (Your signature image url here) with the url you copied onto the Notepad doc. and voila, your'e signature will now magically appear on all posts of your blog as well as on every new post you make. To change the graphic, simply put in the new url of your new image. If you want to make your image a button that links to your email address, just add the following code directly before
<a href=mailto:YOUREMAILADDRESS">
Subscribe to:
Posts (Atom)

